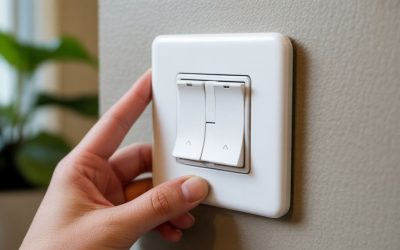
Upgrading to smart devices can enhance the functionality and convenience of your home. Among these smart gadgets, a smart switch is particularly notable, providing greater control over your lighting and energy consumption.
Table of Contents
- Benefits of a Smart Switch
- Choosing the Right Smart Switch
- Required Tools and Safety Precautions
- Installation Process
- Programming Your Smart Switch
- Key Takeaways
- Frequently Asked Questions
- Schedule Your Electrical Service Today
Benefits of a Smart Switch
Smart switches offer a range of advantages over traditional switches. One of the main benefits is the ability to control lighting from your smartphone or a voice-enabled device. This feature allows you to light up your home before you arrive, enhancing security.
Other benefits include:
- Energy Savings: Smart switches can help reduce energy usage by allowing you to set schedules.
- Remote Access: Control your lights from anywhere using your phone.
- Integration: Smart switches can be integrated with home automation systems, enabling complete control.
- Customization: Set up mood lighting for different occasions.
These features make smart switches a popular choice among homeowners looking to modernize their spaces.
Choosing the Right Smart Switch
When selecting a smart switch, consider the following factors:
- Compatibility: Ensure the smart switch is compatible with your home’s Wi-Fi system and any existing smart home devices.
- Type of Switch: Select from single-pole, 3-way, or dimmer switches according to your lighting requirements.
- App Control: Check if the switch has an intuitive app for easy usage.
- Voice Control: Look for options that work with popular voice assistants, such as Amazon Alexa or Google Assistant.
Taking these aspects into account will help you choose the most suitable smart switch for your home.
Required Tools and Safety Precautions
Before starting the installation, gather the necessary tools:
- Screwdrivers (flathead and Phillips)
- Wire strippers
- Voltage tester
- Electrical tape
Safety should always be a priority. Follow these precautions:
- Turn Off Power: Ensure the electricity is turned off at the circuit breaker before starting.
- Use a Voltage Tester: Confirm that there is no electrical current in the wires you’ll be working with.
- Secure Loose Wires: Use electrical tape to wrap exposed wire ends to prevent accidental contact.
These steps will help ensure a safe installation process.
Installation Process
Installing your smart switch can be done in a few simple steps:
- Remove the Old Switch: Unscrew and take out the existing switch from the wall.
- Take Note of Wiring: Use your phone to take a picture of the wiring layout for reference.
- Connect the Smart Switch: Match the wires from the wall to the corresponding terminals on the smart switch. Generally, you will connect:
- A black (or red) wire to the “live” or “line” terminal.
- A white wire to the neutral terminal.
- A green or bare wire to the ground terminal.
- Secure the Switch: Once the wires are connected, carefully push everything back into the wall box.
- Screw in the Smart Switch: Secure the switch to the wall, making sure everything is snug.
Following these steps will ensure a proper and secure installation.
Programming Your Smart Switch
After installation, it’s time to program the smart switch. Here’s how to do it:
- Restore Power: Turn the power back on at the circuit breaker.
- Download the App: Download the Smart Switch’s app from your mobile store and create an account if prompted.
- Connect to Wi-Fi: Follow the app’s instructions to connect the smart switch to your home Wi-Fi network.
- Configure Settings: Customize settings, such as timers and mood lighting, according to your preferences.
Completing these steps will enable you to enjoy the benefits of your new smart switch.
Key Takeaways
– Smart switches enhance the convenience and control of your home lighting.
– Understand compatibility, type, and app features when selecting a switch.
– Ensure safety by turning off power and using the right tools during installation.
– Follow a systematic process for the installation and programming of your smart switch.
Frequently Asked Questions
What if my smart switch is not connecting to Wi-Fi?
Ensure you have entered the correct Wi-Fi password and verify that your router is functioning properly. Moving the switch closer to the router may also help.
Can I use a smart switch with a regular bulb?
Yes, as long as the bulb is compatible with the smart switch. Dimmable bulbs work best with smart dimmer switches.
Is the installation easy enough for a beginner?
Yes, most people can install smart switches with basic DIY skills. Follow the safety guidelines and the provided instructions carefully.
Do smart switches require a hub?
Some smart switches require a hub for connectivity, while others can connect directly to Wi-Fi. Always check the product specifications.
What if I have multiple switches for one light?
For 3-way switches, ensure you purchase a compatible smart switch that supports 3-way functionality.
Schedule Your Electrical Service Today
Are you ready to modernize your home with smart switches, but need assistance? Professional electricians can help ensure the installation is done safely and effectively. Don’t hesitate to take the next step for your home’s safety. Contact us today to schedule your electrical service and enjoy the benefits of smart technology!